How to Fix Short Electrical Wires in a Box
Today we’re talking about a common issue many DIYers and electricians run into: short electrical wires inside a device box—and how to fix them. Stick around and let’s walk through it together.
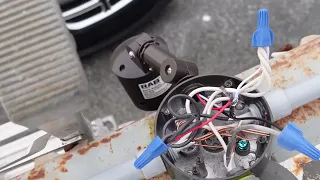
The Problem: Wires Too Short to Work With
We’re looking at a typical wiring box that has some very short wires inside. From a side view, you can clearly see there’s not much to work with. So, what happens when you go to change a device and the wires are just too short?
There are generally two ways to fix this:
- Try to Pull More Wire
Sometimes you can loosen the box connector at the back of the box and pull more wire out. You might be able to get some extra slack, strip it, and make your connections. - Use Pigtails to Extend the Wires
Often, there isn’t any slack because electricians tend to minimize wire use by running directly into the box. When that’s the case, we need to extend the wires using pigtails—and that’s what we’ll show you next.
Step-by-Step: How to Extend Electrical Wires with Pigtails
Step 1: Strip the Short Wires
First, we use a pair of wire strippers to carefully strip the existing short wires. Make sure to strip them at the correct gauge (14-gauge in this case). Strip each wire individually to expose the copper ends.
Step 2: Extend the Ground Wire
The ground wires are often the shortest, so we start there.
- Take a piece of 14/2 wire and strip off the outer sheath.
- Isolate the ground wire and bend about two inches at the end.
- Insert the bent ground wire into the box and line it up with the existing ground wires.
- Using linesman pliers, twist the wires together clockwise to secure them.
- Cap the connection with a wire nut (or “Merit” connector), using pliers if needed due to limited space.
- Tuck the newly extended ground wire neatly into the back of the box.
Step 3: Extend the Neutral (White) Wire
Next, we extend the white (neutral) wire.
- Strip the end of your white pigtail.
- Line it up with the existing white wires.
- Twist them together using your fingers first, then tighten with pliers.
- Trim any excess from the end and cap it with a wire nut.
- Again, tuck it back carefully into the box.
Step 4: Extend the Hot (Black) Wire
Finally, we do the same with the black (hot) wire.
- Strip and bend the black pigtail.
- Line it up, twist it clockwise with the other black wires, and secure with a wire nut.
- Trim and tuck it into the box like the others.
Final Touches: Install Your Device
With your new extended pigtails, you’ll now have three nice long wires to work with. Trim them to about 6–8 inches in length, which is up to code.
- Put a hook on each wire end for device terminals.
- Connect the black (hot) to the gold screw.
- Connect the white (neutral) to the silver screw.
- Connect the bare copper (ground) to the green screw.
Tighten the terminals, mount the device back into the box, and you’re done!
That’s a Wrap!
And there you have it—how to extend short wires in an electrical box using pigtails. We use this method all the time when there’s not enough wire to work with, especially in older homes or previously over-wired boxes.
Hope you found this helpful! Don’t forget to like, subscribe, and smash that like button. See you on the next one!